Peanut Butter Marshmallow Candy

Merry Christmas! Too soon? It is December, so, for me, it’s Christmas all month long!

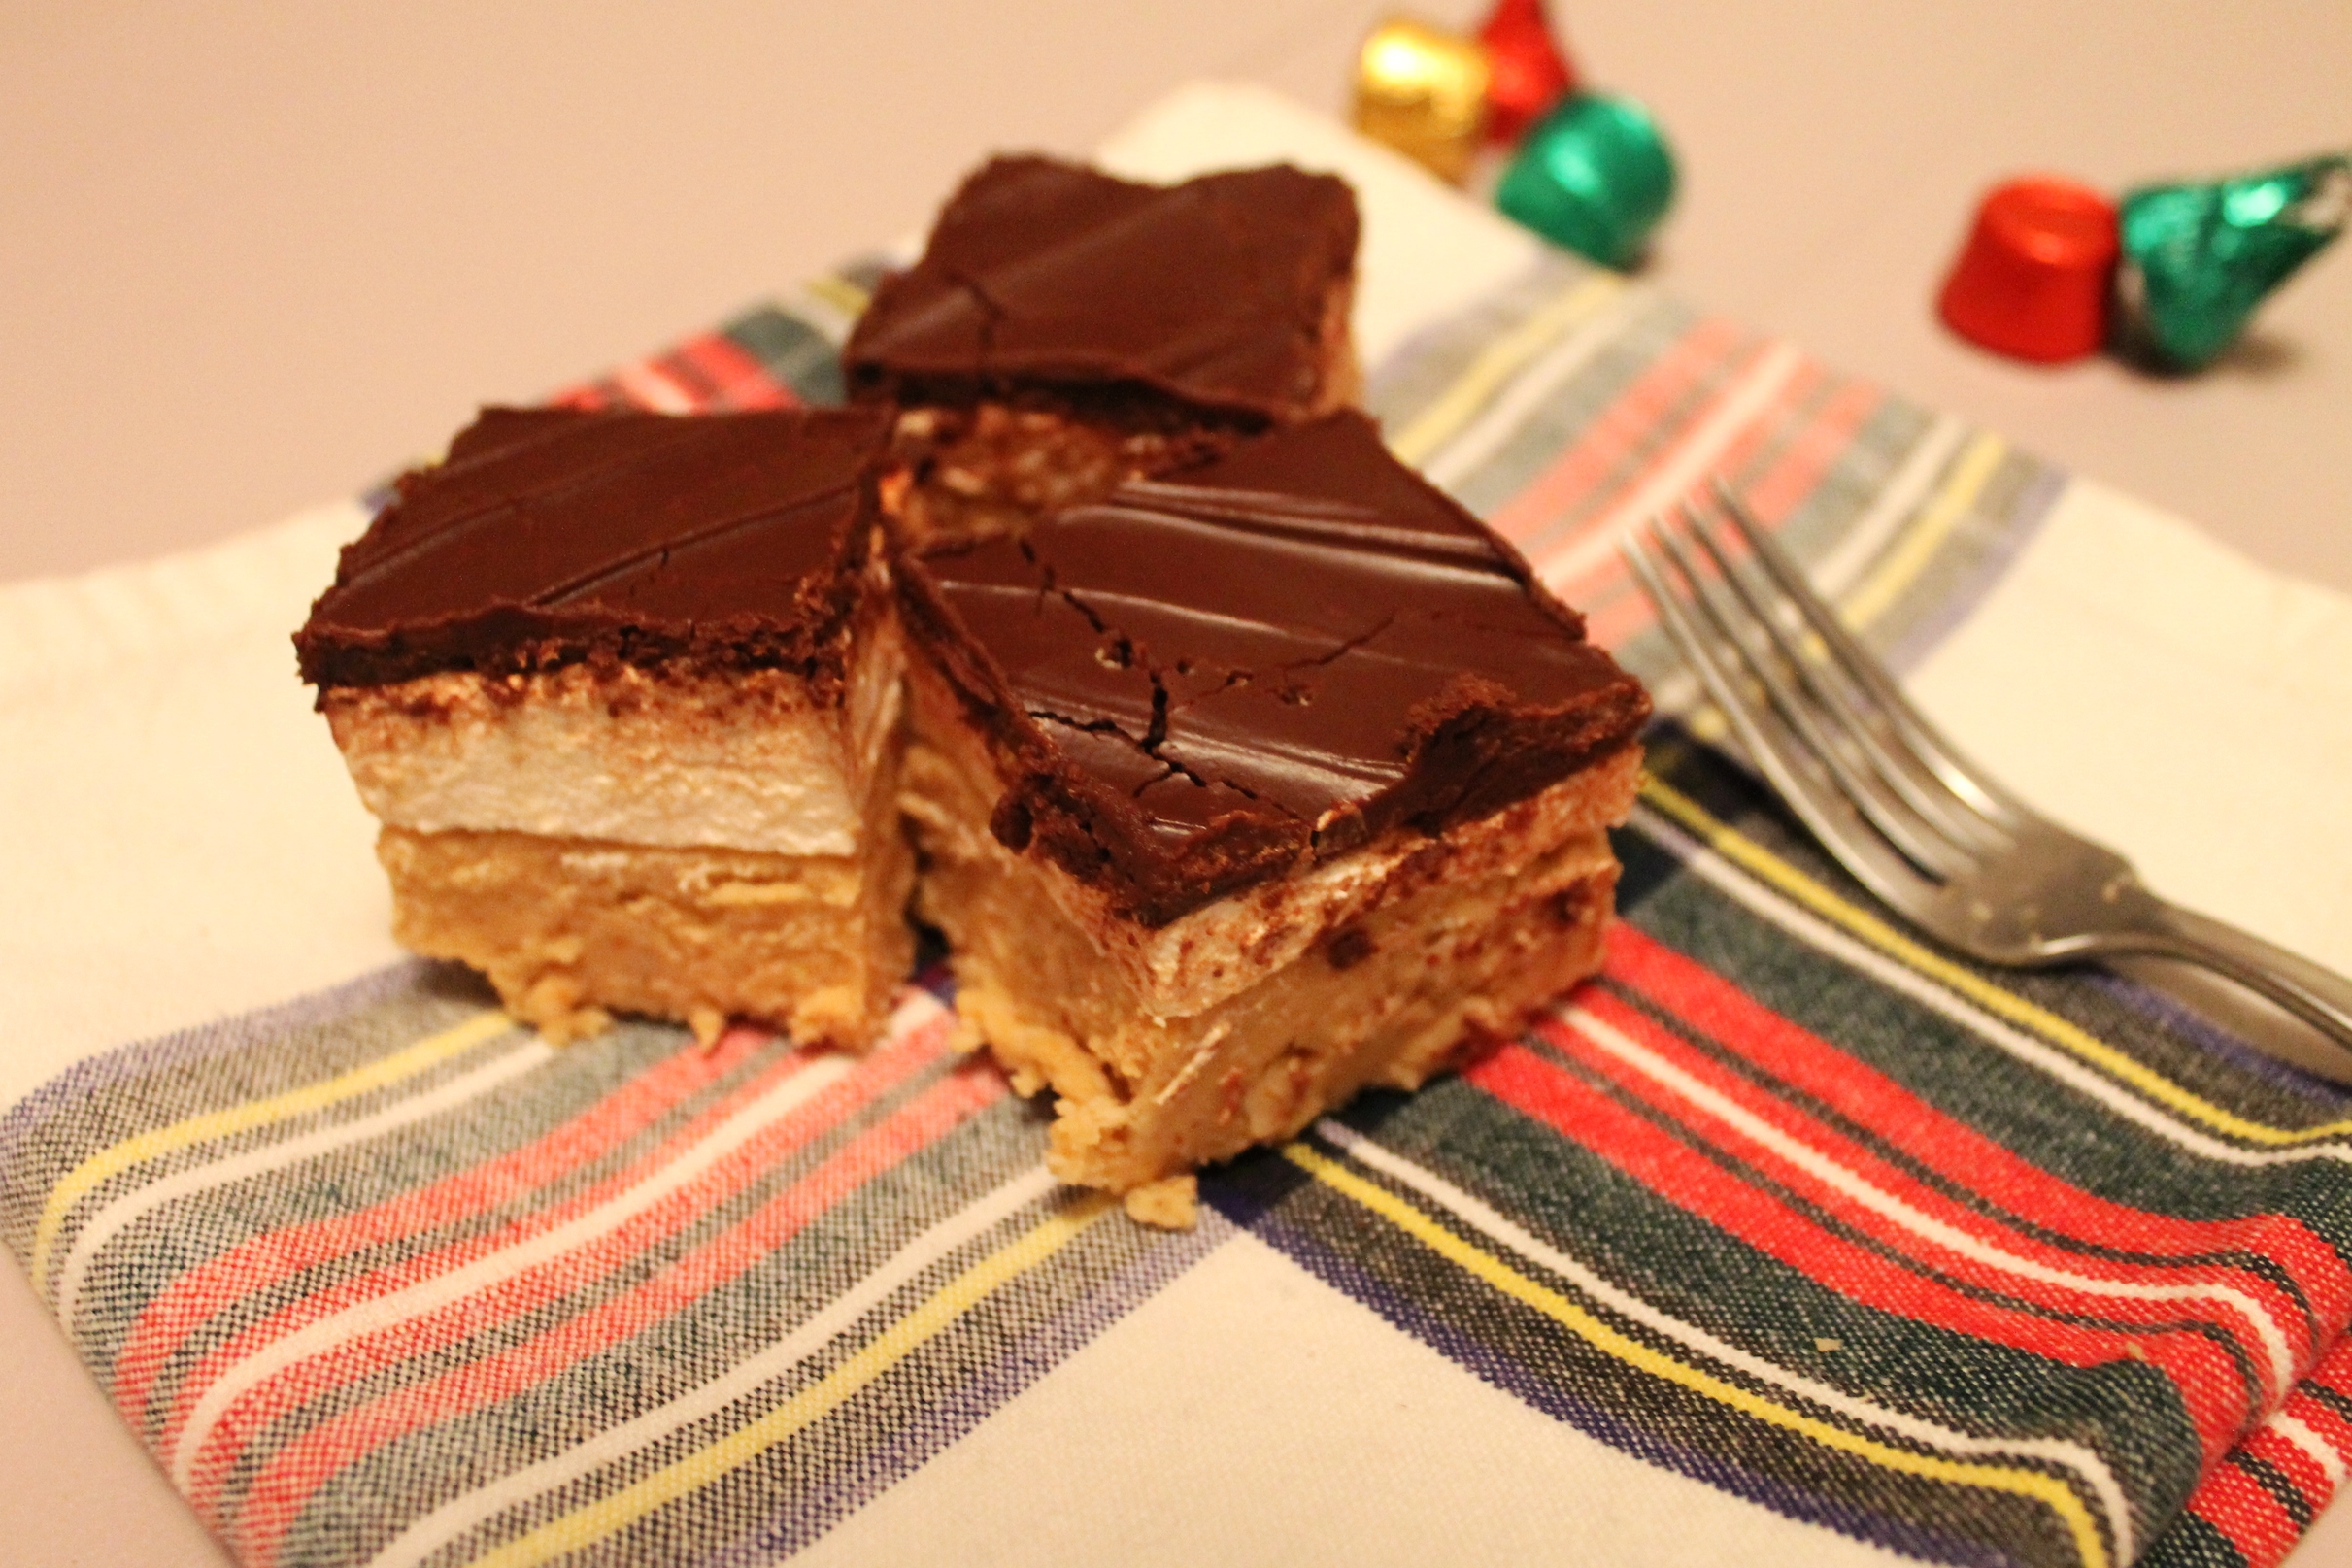
I wanted to kick off this holiday baking month with some “candy” that my mom makes each year for Christmas. Traditionally, my mom makes these with a thick peanut butter crust and a layer of chocolate on top. I added some homemade marshmallows between those two layers to kick it up a notch, to turn my moms PB Candy into PB Fluff Candy! Or could we call it S’mores Candy?

Let’s stick with PB Fluff—bring back some of those happy childhood times when you would open your lunchbox up to a peanut butter and fluff sandwich!

Anyways, let’s stop being sidetracked by childhood nostalgic moments...

Each year for Christmas, my mom will make at least two pans of this incredible candy. Usually, it will go out as gifts with some other homemade breads and cookies, wrapped in adorable tins with snowmen on them, spreading endless cheer. Other times, my brothers and I will eat so much that we get stomachaches, but it’s worth it.

First off, who doesn’t love peanut butter?!(—another nut butter can be substituted!) But peanut butter. You can eat it by the spoonful, you can put it on toast, you can eat it by the spoonful, you can cover fruit in it. Yeah, endless possibilities, and you can turn it into a thick, wonderfully sinful crust that you will eat 10 pieces too many of. Sounds magical, huh?

Want some homemade marshmallows on top? This recipe from over the summer is OH so simple, and makes this candy that much more fabulous. Final piece of this delicious puzzle? A melted butter and chocolate glaze—as you know peanut butter and chocolate ARE a match made in dessert heaven!

While this may not be coated in candy canes or be a cute little gingerbread man that you can decorate with icing and sprinkles, this is such a fabulously tasty peanut butter fluff candy that can be given as gifts, enjoyed at holiday parties, or just quietly eaten in the corner with a fork…

I would say go ahead, make a batch, but I think that saying make three batches is going to be your safest bet—you will not want to run out of this candy at any point during this absolutely magical month of December!

IMG_5945.JPG

ingredients

Butter (melted)—12 oz, or 1 ½ C

Peanut Butter—17.5 oz, or 2 C

Confectioner’s Sugar—22.5 oz, or 4 ½ C

Graham Cracker Crumbs—1.5 oz, or ½ C

Oats—4.5 oz, or 1 ¼ C

Marshmallows—Recipe found here, or 1 bag (fluff can be used, too!)

Butter—4 oz, or ½ C

Semi-Sweet Chocolate Chips—12 oz, or 2 C


process

In a large bowl, combine the 12 oz of melted butter, peanut butter, confectioner’s sugar, graham cracker crumbs and oats.

Mix until a dough forms.

Press into the bottom of a 9” x 13” pan.

Next, whether you have decided to just use store bought marshmallows, or my homemade marshmallow recipe (super simple!), layer this on top next.

This homemade marshmallow recipe will take only about 20-25 minutes to make. It’s so quick and easy, and who won’t be impressed by them??!

In a heatproof bowl, melt together the 4 oz or butter and chocolate chips either in your microwave or over a double boiler.

Once melted and mixed, pour over your marshmallows.

Allow to set and cool.

Cut and enjoy!


Bon Appétit!

Whole Wheat Spice Bread

Happy Day After Thanksgiving!

…Or should I call it Leftover Friday? Was everyone’s Thanksgiving absolutely magical? Was it full of mashed potatoes and love, wine and gossip, five slices of this semifreddo and the parade?! I sure hope so!

Is it just me or does everyone stuff themselves even more with leftovers the day after Thanksgiving? Basically being like oh shoot! There’s 10 more pounds of stuffing and gravy and turkey and brussels sprouts and beans and I need to eat them all RIGHT NOW. Sounds familiar, doesn’t it?!

While everyone has their day of Thanksgiving traditions, I feel like the day after is just as special—yes, I am referring to fueling up with a leftover brunch and listening to Christmas music… So, rather than throwing every single food that was so beautifully displayed on the table yesterday—decorated with cute little pumpkins, candles, the nicest dishes—into one massive bowl and mixing it into just a pile of amazing, I was like oh. Man. I. Must. Make. A. Sandwich.

Game changer! A Thanksgiving sandwich?! Hey, I think Ross kind of had the idea going, even throw in a gravy-soaked piece of bread in the middle, “the moist maker” if you will.

Bring in the whole wheat bread.

Yes! Whole wheat! Spices! Molasses! This breads flavor is so full of warm cinnamon and allspice, it is just slightly sweet with natural honey, and so hearty from the whole wheat flour. Who doesn’t love freshly baked bread first of all, but the smell of it baking in the oven is better than any candle I own! It’s also great friends with turkey and gravy, or better yet, a nontraditional leftovers brunch of eggs and some fried prosciutto! Like, what?!

What doesn’t go well on this whole-wheat spice bread? I couldn’t tell you!

So whether you went out at midnight for some shopping, or decided to stay in your PJs all day and eat plate after plate of potatoes, this bread makes for the perfect brunch, lunch, or anytime leftover companion!

ingredients

Dry Active Yeast—0.25 oz, or 1½ tsp

Water—8 oz, or 1 C + 2 TBL (separated)

Honey—1.25 oz, or 2 TBL

Whole Wheat Flour—15 oz, or 2½ C

AP Flour—2.75 oz, or ½ C

Cinnamon—0.1 oz, or 1 tsp

Allspice—0.05 oz, or ½ tsp

Canola Oil—0.25 oz, or 1½ tsp

Molasses—0.5 oz, or 1½ tsp

Salt—0.25 oz, or 1¼ tsp


process

In the bowl of your stand mixer, whisk together the yeast, honey and ¼ C/1.75 oz water—making sure that the water is between 105˚-115˚ F.

Let sit for 5 minutes, so that the yeast can begin to activate; you’ll notice that it will start to foam a bit.

In a separate bowl, combine the flours, cinnamon and allspice.

Once the yeast has begun to bubble, add in the remaining water (at the correct, warm temperature), oil, molasses and half of the flour/spice mixture.

Mix.

Add the rest of the flour and salt to the mixture.

Mix at medium speed, with the dough hook, for 10-12 minutes, until the dough forms into a ball and is kneading/slapping the sides of your mixer.

If the dough isn’t coming together after a few minutes, add a couple of tablespoons of water to the mixer.

After the 10 minutes, transfer the dough to an oiled bowl.

Cover with plastic wrap and a towel.

Allow to rise for about 2 hours, until it has doubled in size.

After the first rise, put the dough on your floured work surface.

Roll the dough into a rectangle that’s about 9” x 12”, the length of your loaf pans.

Fold the dough into a business letter—taking the top third, folding it down, and then the bottom third and folding it up.

Pinch to seal the seam; pinch in the ends so that it will fit into the pan.

Cover again with plastic wrap and a towel.

Allow to rise, again, until it has doubled in size—anywhere from 1-2 hours, all depending how warm the room is.

When you are ready to bake the bread, preheat your oven to 375˚ F.

Bake the bread for 30 minutes. The bread will become slightly brown when finished.

Remove from the oven and allow to cool a bit before taking out of the loaf pan.

Slice and enjoy!


Bon Appétit!


Pumpkin Chocolate Fudge Cake

IMG_5819.JPG

Here is dessert #1 of my little Thanksgiving Dessert Twists series. This year, I have decided to go on a different route than normal using the same major ingredients—pumpkin, apple, pecans. First stop is pumpkin pie!

While you can never replace a pumpkin pie, with its warm spices, natural wholesome pumpkin flavor, flaky, buttery crust, I believe you give it a nice chocolate friend for us that are super obsessed! I know that you’re seeing pumpkin everything everywhere right now—from the latté to the candy, the chip to even the beer, it’s been absolutely huge this fall, and rightfully so. Pumpkin is something that obviously screams autumn, and holidays, and warm coziness. As you have read in many, many of my most recent posts, you just can’t make it through September-November without a pumpkin baked good! Like here and here.

So, naturally, I have added yet another pumpkin dessert to the table, but this time not only is it full of rich chocolate, this fudge cake can be made in fabulous individual ramekins—basically made to order! After an extremely long afternoon of eating that incredible Thanksgiving dinner, you can pop one of these little cakes into the oven, digest for 30 minutes while it bakes and cools slightly, and then truly indulge. They can even be made a day ahead of time—bonus points!

I love the denseness in this cake. Looking at the ingredients, chocolate is what it’s mostly made up of! You’ve got a tiny bit of butter + the pumpkin purée for a bit of fat, eggs to bind it, a touch of sweetness, and then some flour to give it some body. There isn’t even that much sugar in it! Can we argue that it is mildly healthy?! Sure!

And, it is Oh. So. Fudgy. Like, out of this world. This is like a deluxe, eat at a really nice restaurant dessert—and you can have it for any party, not just Thanksgiving, and blow people’s minds!

Choose your favorite chocolate, try not to eat half the bar like me, and treat yo’self to the most luxurious chocolate pumpkin fudge cake there is!

IMG_5811.JPG

ingredients

Semi-Sweet Chocolate (melted)—4 oz

Butter—0.75 oz, or 1 ½ TBL

Brown Sugar—1 oz, or 2 TBL

Eggs—2

Flour—0.65 oz, or 2 TBL

Salt—pinch

Puréed Pumpkin—1.25 oz, or 2 TBL

Cinnamon—0.1 oz, or ½ tsp


process

Over a double boiler, melt your chocolate. Once melted, remove from the heat and allow to cool slightly.

Preheat your oven to 425˚ F.

Rub the inside of 2 ramekins with butter.

In the bowl of your mixer, cream the butter and brown sugar.

Add the eggs.

Once combined, add the flour, salt, cinnamon and pumpkin.

When all is mixed well, add a small amount of the melted chocolate, just so that the eggs won’t be shocked by the warm chocolate therefore they won’t cook.

Once the chocolate has been mixed well with the batter, slowly stream in the rest of your chocolate. Mix until just combined.

Pour the batter evenly into the 2 ramekins, they should not be filled any higher than ¾ of the way.

Place on a sheet pan and place in the oven.

Bake for 12 minutes, the cake will just start to pull away from the sides of the ramekin.

Remove from the oven, allow to cool for just a couple of minutes.

The center is slightly molten, and will become extra rich and fudgy the more that it cools!

You may either eat right out of the dish, or invert onto another place, dust with confectioner’s sugar, add a little bit of whipped cream, and enjoy!


Bon Appétit! 

Ginger Apple Cake with Dulce de Leche Drizzle

IMG_5834.JPG

I know that an apple pie is basically a must at any and all fall events, especially at Thanksgiving, but today, I am giving you an addition to an apple pie—a ginger apple bourbon cake. Those three ingredients go together better than a peanut butter & jelly fluffernutter.

Mmm mm mmm.

Come to think of it, I don’t know why all apple pies don’t have the ginger and bourbon in them as well. Although bourbon and I weren’t that great of friends until we met up in Louisville and became besties, now I have the urge to put it in every single thing that I bake with. Whether cookies, cakes, pies, in a glass, we are sort of attached at the hip.

Did I just say that I am best friends with bourbon? I guess it can’t be too far off, seeing as I am basically a cookie in human form—yes, I seem to eat at least a couple a day…

So, when I decided to bake this cake, I figured that I wanted as much flavor as possible, for this to taste more like an apple covered in bourbon and rolled in ginger, which, I believe, is what the final product truly tastes like. By soaking the apples in the alcohol, they really absorb all of the flavor, and then adding the saturated apples as well as remaining liquid into the cake batter, it’s like a delicious punch in the face!

Okay—let’s go for a big hug of flavor instead.

Fresh, minced ginger. Enough said. Covered in some caramel or dulche de leche. I know I have you salivating!

As I sit here and munch on a piece that is bigger than I care to admit, I feel like if I could just hand out a cake to each of my readers, you would be instantly sold and would be saying “this is the bomb”—like Roberto did. Sadly, I can’t see all of you fabulous KBBakers and give out cakes, so you’re going to have to trust my apple-ginger-bourbon trio, knowing that it is to die for, and bake a few cakes yourself!

IMG_5824.JPG

ingredients

Granny Smith Apples—2 medium

Butter—6 oz, or 12 TBL

Brown Sugar—3.75 oz, or ½ C

Sugar—2 oz, or ¼ C

Eggs—2

Bourbon—0.75 oz, or 2 TBL

Flour—6.25 oz, or 1 ¼ C

Fresh Ginger, minced—0.35 oz, or 1 TBL

Cinnamon—0.2 oz, or 1 tsp


process

Dice the apples into small cubes.

Combine the diced apples along with the bourbon in a small saucepot.

Put on the heat, bring to a boil, and then turn off the heat, cover and allow to sit until ready to put in your cake batter.

Preheat your oven to 325˚ F.

In the bowl of your mixer, cream the butter and sugars.

Add the eggs.

Once incorporated, add in the sifted flour, cinnamon and minced ginger.

Add in the apples/bourbon mixture.

Only mix until your batter has formed, overmixing will lead to air bubbles in your final product.

Spray a bundt pan with nonstick spray, and then coat with a light layer of flour so that the cake will come out easier after it has baked and cooled.

Pour your batter into the prepared pan.

Bake for 45 minutes, until the cake springs back when touched.

Remove from the oven and allow to cool completely before taking it out of the cake pan.


to make dulche de leche

Fill up a large pot with water and bring to a boil.

Take a can of sweetened condensed milk and remove its label.

Once your pot is boiling, place the can (I like to make at least 2 cans at once, always a great sauce to have on hand!) on its side, making sure that the water is fully covering the can.

If you do not keep the cans covered with water the entire time, there's a chance that the cans will explode from uneven heat!

Allow the cans to simmer for anywhere between 2 hours 30 minutes and 3 hours.

After the time has passed, very carefully remove the cans from the simmering water (oven mitts and tongs!),

Allow them to cool completely before opening.

Once cool, open and use!

Store in an airtight container in the refrigerator.


Bon Appétit!

Pecan Pie Semifreddo

Is it ice cream? Is it gelato? No, it’s semifreddo!

Oh my goodness, my fellow dessert enthusiasts, I have become every ounce obsessed with this homemade semifreddo. Don’t have an ice cream machine but want something that is 1. Homemade 2. Ice cream and 3. Super tasty?! Look no farther, it is here!

As I continue my streak of Thanksgiving dessert twists, here, I give you a Pecan Pie Semifreddo—which means semi frozen in Italian. The texture in this semifreddo is that of a slightly frozen mousse, and yes, you do put it in the freezer! The combination of heavy cream to sugar to eggs allows for this ridiculously smooth and creamy dessert that melts in your mouth and doesn’t give you a brain freeze.

How is this anything like a pecan pie? Well, listen up, look at that gorgeous crust, it is packed with pecans, butter and, my favorite, brown sugar. While I love pecan pie and all of its sweetness, this crust has just the right amount of sugar so that you will most definitely be reminded of your old favorite.

To make this semifreddo really pop, I swirled in some homemade duche de leche. This brings up the sweetness level yet does not take away from that simple taste of the egg-heavy cream combination that you worked so hard on!

Who knew that one could be so infatuated with a dessert, let alone this play on pecan pie. But, I most certainly am, and I’m not even a little ashamed! Looking to show up that pecan pie this Thanksgiving? Surprise everyone with an even better pie—a semifreddo! Exploding with pecan goodness and a velvety dulce de leche yumminess, I swear, you’ll be passing out the recipe by the end of the night!

crust ingredients

Butter, melted—1.5 oz, or 3 TBL

Graham Cracker Crumbs—2 oz, or ½ C

Brown Sugar—1 oz, or 1/8 C

Pecans, chopped—2 oz, or ½ C


crust process

Preheat the oven to 350˚ F.

Combine all of your ingredients, you want it to have the consistency of wet sand.

Press into the bottom of your pan.

I like to use a tart pan for this. It looks very elegant, and quite pie-like, but using a spring form pan, loaf pan, whatever you choose works just as well!

Bake in the oven for 8 minutes, you will be able to smell the toasting crust.

Remove and allow to cool completely before putting your semifreddo in.


semifreddo ingredients

Heavy Cream—12.5 oz, or 1 ½ C

Sugar—8 oz, or 1 C

Eggs—3

Yolks—2


semifreddo process

Begin by whipping your heavy cream in your mixer, or by hand, until medium-stiff peaks form. You will know when this has occurred when you lift the whisk and your whipped cream has a slight curl to the end of it.

Reserve your whipped cream in another bowl in the refrigerator.

Wash and dry your mixing bowl.

Combine the sugar, eggs and egg yolks in your mixing bowl.

Place on top of a small saucepot that has been filled with about an inch of water, making sure that it is not directly touching your bowl.

Turn the burner on low and, with a whisk, constantly whip your egg sugar mixture until the sugar has dissolved—this should be around 120˚ F.

Once you have reached this stage, turn off your burner and put the bowl on your mixer with the whisk attachment.

Whip on medium-high until your eggs have turned a pale yellow and have formed ribbons.

To do the “ribbon test”: when you believe that your eggs have been whipped long enough, stop the mixer and dip the whisk attachment into the batter, go back and forth, making a line with the eggs. If they hold for 3-5 seconds without sinking back into your mixture, then you are good to go!

Now, take the whipped cream from the beginning and fold into your whipped eggs.

How to fold in the cream? First, put a small bit of the whipped cream in to temper, mixing quickly with your spatula, next put into about ½ of your remaining cream. As a chef of mine used to say, “12:00, 6:00, give it a quarter turn,” meaning simply that start with your spatula at 12:00 on your bowl, drag down to 6:00, and give the bowl a quarter turn. Do this until all of the cream is mixed in and is homogenous.

Transfer on top of your crust that has been baked and cooler.

Now, you may either put this in the freezer as is to freeze, or, if you want to add a little extra sweetness, mix in some caramel or dulce de leche! Recipe shown here.

I like to swirl in lots of dulce de leche so that I find yummy pockets in each bite!

Once frozen, remove from your pan, slice and serve.


Bon Appétit!