Lemon Cranberry Swirl Bars

When it comes to Thanksgiving, lemon may not be something you instantly think of. There are always those pumpkin, apple, or pecan pies, which are amazing, don’t get me wrong, but why not something a little lighter? A little something something to refresh that palette after you eat 5 helpings of mashed potatoes and way too many servings of stuffing (if there is such a thing!)?

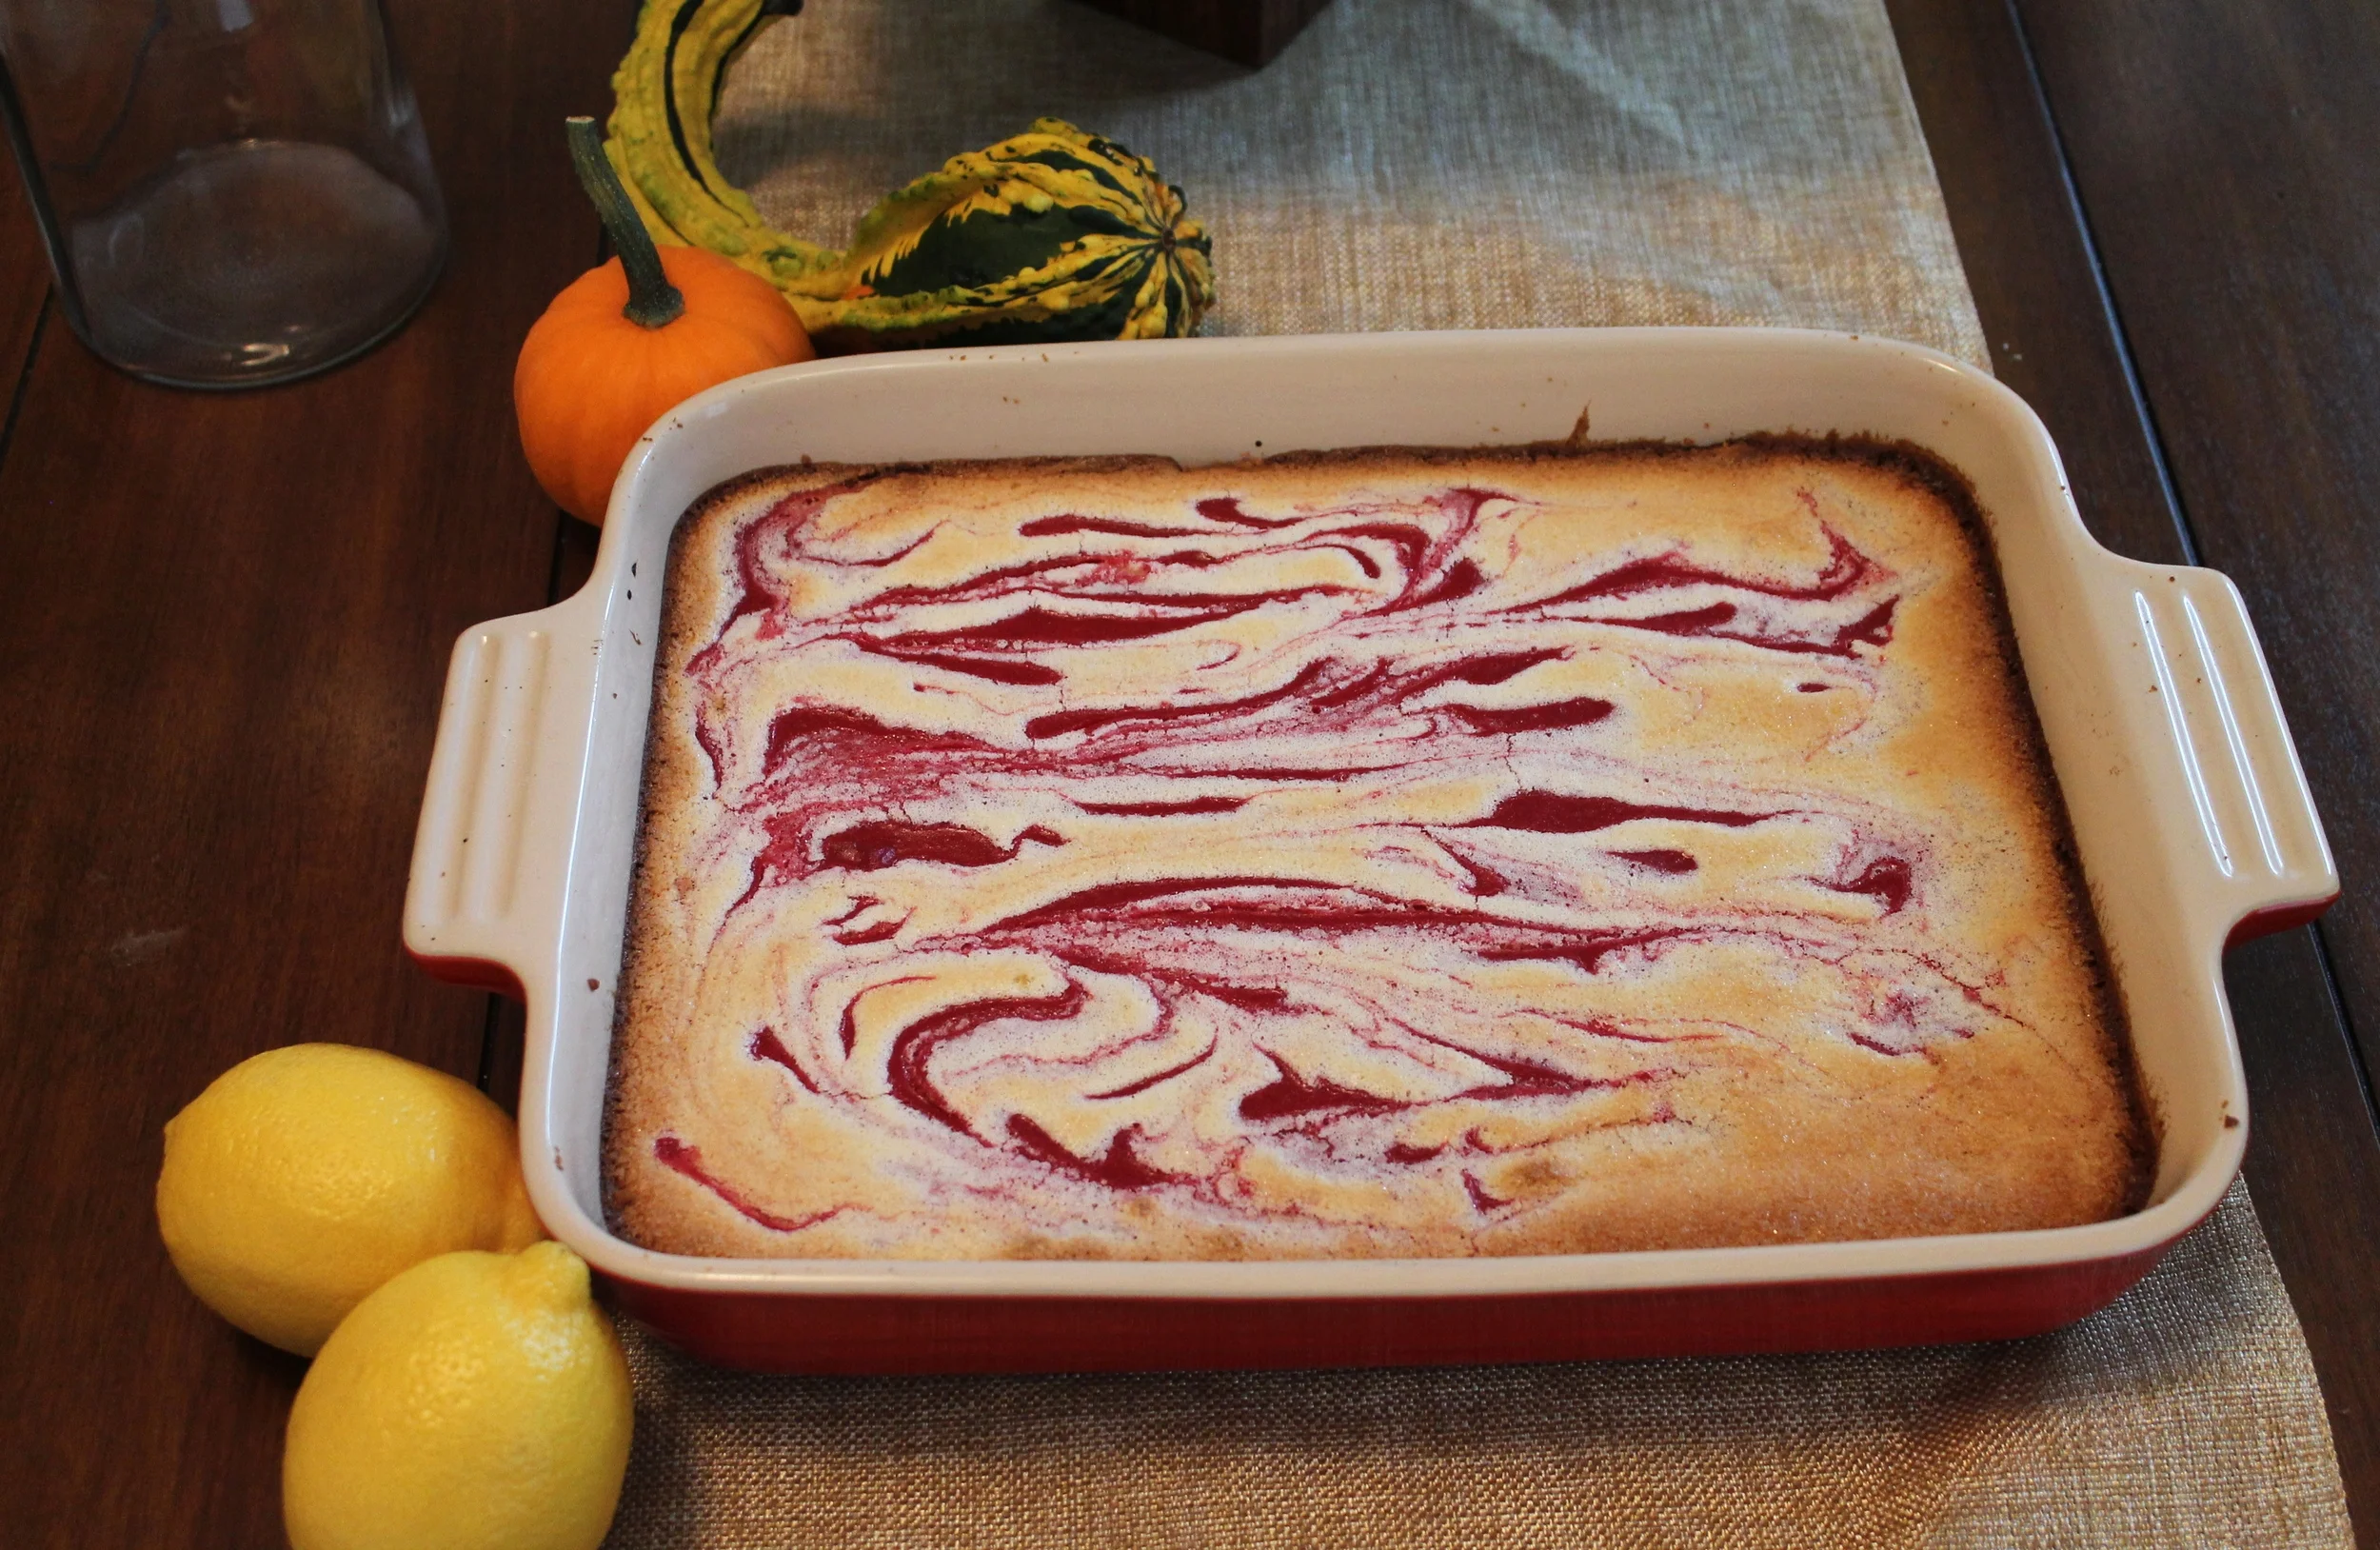
These lemon cranberry swirl bars, I believe, are the answer to all of your “I’m so stuffed, I can’t eat another bite of anything else” feelings. I always thought that my mom was silly for being absolutely in love with any dessert that involved lemon, I mean come on mom, no chocolate = no dessert. But these bars have changed the game completely.

Maybe you aren’t sold because you’re not really a lemon meringue pie type of person, or, you’re like me, who needs something super rich and way too decadent to even consider it a dessert. WELL MY FRIENDS, this has even me converted.

It could be the fact that the crust is like one big sugar cookie…

Oops…

But let’s look beyond that! There’s this amazingly tart, yet sweet, lemon curd that has these mesmerizing cranberry swirls all over it. How can you not just love that? While lemon may be a far-fetched flavor during November and December, cranberry is certainly going to making its appearance more than once.

So, there you go my lemon lovers and soon-to-be, a dessert that is equally refreshing as it is vibrant in all sorts of intense flavors. Plus there's the added fun of making the cranberry swirl in any design, I could do that for hours. I guess my mom will start needing to share her part of the dessert table this year!

crust ingredients

Butter—14 oz, or 3 sticks + 4 TBL

Sugar—7 oz or 1C 1 TBL

Eggs—1

Yolks—2

Salt—½ tsp

Flour—20 oz, or 4 C


crust process

In the bowl of your mixer, cream the butter and sugar.

Once light and fluffy, add in your egg and yolks.

When combined, add in the flour and salt.

Mix until your dough is formed, refrigerate to chill and until ready to use.

When you are ready to prebake the crust, preheat your oven to 350˚ F.

On a floured work surface, knead the dough so that it becomes more pliable and easier to roll.

Roll out your crust into a rectangle that is about ¼” thick and is about an inch bigger than the size pan that you’ll be using. I use a 9” x 13” pan, therefore rolling my dough into a 10” x 14” rectangle.

Take your crust and press it into your pan that has been sprayed with nonstick spray.

Poke holes in it with a fork, this works as a vent, therefore no big air bubbles will come up in your crust while it is baking.

Bake in the oven for 20 minutes, just until the crust begins to become slightly brown.

Let it cool until you’re ready to use for the filling.


filling ingredients

Lemon Juice—4.25 oz, or ½ C

Sugar—22 oz, or 2 ¾ C

Cranberries—4 oz, or 1 C

Water—2 oz, or ¼ C

Eggs—3

Yolks—3

Flour—4 oz, or ¾ C


filling process

In a small saucepan, combine the cranberries, water and 2oz/¼ C of the sugar.

Over low heat, stir the berries until they begin to simmer and pop open.

The cranberry mixture will begin to thicken, this should take anywhere from 8-10 minutes.

Once all of the berries are cooked and very thick, strain them. Set aside until you are ready to use.

Preheat your oven to 350˚ F.

In a bowl, whisk together the lemon juice, remaining sugar, eggs, yolks and flour.

Add a few spoonfuls of this lemon mixture to your strained cranberry purée.

Pour the lemon juice filling into the par-baked crust.

Drop spoonfuls of the cranberry purée around the lemon filling, and then proceed to swirl with a knife.

When you are satisfied with how your beautiful cranberry swirl design has come out, bake for about 35 minutes, until the filling has set.

Remove from the oven, allow to cool.

Finish with a nice dusting of confectioner’s sugar and enjoy!


Bon Appétit!

Dried Fruit Granola

This is my first, of many I hope, recipe collaborations! I have been pressuring my fiancé for many, many months to make his granola recipe for me to share with everyone! Not only is this one super tasty, but also it’s so versatile! Not a huge fan of raisins? Coconut? Substitute them!

Clearly I am excited, as I have used 5 exclamation points in the last 6 sentences!

This past week has been Thanksgiving recipe testing mania. I have been working with iamduende.com creating something extra special for all of you for the upcoming holidays! Can you believe that Thanksgiving is just 2 weeks away?! Between lots of work and endless making and remaking of desserts, there’s hardly been a moment of downtime. Keep in mind that with every recipe that I am testing for this wonderful Thanksgiving special, I am taking endless bites, I mean how else am I supposed to adjust the ingredients?!

This all leads me to just feel oh so balloon-like and even slightly more wound up than usual! I then decided that with this dessert heavy season upon us that I needed to at least have a healthy snack around to munch on instead of my bowl of holiday Rollos and Hershey kisses.

So, as I unwrap my fifth Ghirardelli chocolate bar and melt it down, instead of taking a piece for myself, I instead take a handful of slightly sweet and wonderfully crunchy homemade granola! The natural sweetness in the raisin, cranberry, coconut combination along with the fillingness of the nuts make for an all around wonderful and enjoyable snack.

Feeling extra slumpy recently because you’ve been stuffing your face with any and all things that just scream hey it’s the holiday season, you must eat me! ??! Well, let’s put a slight stop to the madness with this granola!


ingredients

Canola Oil—0.75 oz, or 2 TBL

Honey—3 oz, or 1/3 C

Fresh Ginger, peeled & chopped—0.75 oz, or 2” piece

Oats—9.75 oz, or 3 C

Brown Sugar—1.6 oz, or 3 TBL

Salt—0.05 oz, or ¼ tsp

Cinnamon—0.05 oz, or ¾ tsp

Pecans, chopped—2.25 oz, or ½ C

Coconut Flakes—1 oz, or 1/3 C

Dried Cranberries—2.15 oz, or 1/3 C

Raisins—2.15 oz, or 1/3 C

Candied Ginger—2.25 oz, or 1/3 C


process

In a small saucepot, combine the oil, honey and fresh ginger.

Preheat the oven to 300˚ F.

Put on low heat and stir to dissolve the honey. Keep on low heat until ready to use.

In a large bowl, combine the oats, brown sugar, salt, cinnamon, chopped pecans and coconut flakes. Mix.

Remove and toss the ginger from the honey mixture. Pour the honey/oil into your oats.

Mix to coat.

Spread evenly on a sheetpan that has been lined with parchment paper.

Put in the preheated oven for 25 minutes, stirring every 10 minutes so that your granola toasts evenly.

Once your granola is nice and toasty (you’ll be able to smell it!), remove from the oven and allow to cool.

When it has cooled, mix in your dried cranberries, raisins and candied ginger.

Store in an airtight container, and enjoy as a snack on its own, with some plain yogurt or cashew milk—my favorite!


Bon Appétit!

Ginger Spice Cookies

          Happy November! Now that Halloween is over, the true holiday season is upon us! Why yes, I may begin to watch Elf soon (don’t tell Roberto), and humming some tunes that are only appropriate for next month may occur while I prepare my Thanksgiving dessert menu, but I just cannot help it. While I absolutely adore fall and all that it has to offer, November 1st-December 26th has me in a rather nonstop giddy state. Who knows, maybe there is just 100x the normal amount of love in the air, or maybe I am just super excited for Peppermint Mocha season (sorry, PSL, you no longer win!), but as of November 1st, general happiness is at an all time high!

            So, of course, I had to bake a staple in the winter diet—ginger cookies. Growing up, my grandparents would always have a huge box of these in their house, and I would, not so sneakily, eat handfuls at a time. I used to just let them soak in milk or hot chocolate, get super mushy, and then eat them, about 10 in a sitting, before possibly going back for more. Wow, sugar obsessed much? Not ashamed!

            As I now feel as though it is acceptable for me to purchase these forever favorite ginger snaps, I thought it would be even better to make my own version, so I don’t have to go back to the supermarket every other day to shamefully buy another box! With my addition of candied ginger, the spiciness of this cookie multiplies, and at the same time, brings the sweetness level down—this allows you to eat more of these, guilt free because your mouth isn’t screaming at you for a sugar overload! Best part of my ginger spice cookies? When you roll them in sugar and bake them, they form a nice, crisp outer shell, but leaving the insides soft and chewy, the most amazing combination of textures.

            It’s a good thing that I am feeling extra full of love these days because, as much as I am obsessed with these cookies, my fiancé is even more! So go and take your cheery self into the kitchen, maybe put on a pair of favorite socks that happen to have reindeer on them, or your coziest snowflake sweater, and get to baking!

IMG_5631.JPG

ingredients

Butter—6 oz, or 12 TBL

Brown Sugar—8 oz, or 1 ¼ C

Eggs—1

Molasses—2.75 oz, or ¼ C

Flour—12.5 oz, or 2 ½ C

Baking Soda—0.1 oz, or ½ tsp

Salt—0.05 oz, or ¼ tsp

Ground Ginger—0.15 oz, or 2 tsp

Candied Ginger (cut into small pieces)—0.75 oz, or 1 TBL

Allspice—0.1 oz, or ½ tsp

Black Pepper—0.1 oz, or ½ tsp

Sugar—as needed to roll dough in


process

In the bowl of your mixer, cream together the butter and brown sugar.

Once smooth, add in your egg and molasses. Mix until combined.

Sift together all of your dry ingredients and then slowly add to your creamed mixture.

Once the dough has formed, add in your chopped candied ginger.

Transfer your cookie dough either into another bowl or wrap it in plastic, allow it to firm up in the refrigerator for about an hour.

When you are ready to bake your cookies, preheat your oven to 350˚ F.

Form your cookie dough into whatever sized balls you would like, 2 oz is the perfect cookie size to me!

Roll them in sugar and then put on a sheet pan that has been sprayed with nonstick spray.

Press down slightly.

Put into your preheated oven and bake for 12-15 minutes.

Remove from the pan and allow to cool slightly before eating.


Bon Appétit!

Sweet and Salty Buttercrunch

As Halloween is quickly approaching and I have stuffed my face with enough candy corn, M&M’s and Reese’s Cups for at least a large family, I decided that enough is enough—I must make my own Halloween candy!

For some reason, holiday candy seems to taste that much better to me than if I was to buy the same exact thing at any other time during the year. Something about the packaging, how the stores are decorated, the bite sized candies, really gets me! Since moving into our new apartment that is actually in a neighborhood with potential trick-or-treaters, I figured that there was the possibility of having kids stop by (but who am I kidding, children won’t come into our apartment building…). With the disappointment of not being able to have a creepy candy bowl filled with all sorts of goodies—tootsie rolls were always my weakness—I thought why not have a jar filled with some homemade buttercrunch toffee to munch on well before and after this costume filled evening.

This candy is oh so simple and about 100x more delicious. Butter, sugar, water and a little bit of vanilla (substitute in some bourbon for an adult appropriate Halloween treat) are what make up this sweet and crunchy bite. What else is so great about this homemade candy? You can top it with whatever you choose! Whether leaving it au natural or dressing it up, your taste buds will thank you. To be honest, it is Halloween, where dressing up is pretty magical (minus ages 18-22), so why not give your buttercrunch some flair as well! Covered with melted chocolate, sprinkled with cinnamon, salt and toasted pepitas, your candy has a pretty tasty costume!

While the days of being part of Josie and the Pussycats, a gypsy or Baby Spice are long gone, I would say my adult celebration of homemade candy, a Punkin Ale and a thriller with my fiancé is a pretty great trade!

IMG_5599.JPG
IMG_5613.JPG

ingredients

Butter—4 oz, or 1 stick

Sugar—4 oz, or ½ C

Water—0.75 oz, or 2 TBL

Salt—pinch

Vanilla Extract—0.15 oz, or 1 tsp


Chocolate, 70%—2 oz

Toasted Pumpkin Seeds—½ C

Salt—1 TBL


process

In a small saucepan, melt the butter.

Add in the sugar, water and salt; stir.

At medium heat and while constantly stirring, cook your toffee until it reaches 295˚ F.

Remove from the heat and add in your vanilla.

*To make this toffee a little unique, replace the vanilla with an equal amount of bourbon!*

Pour onto a sheet pan that has been lined with parchment or a silpat.

Spread quickly with a spatula and allow to set.

Once the candy has set, blot with a towel to pick up any oil that has come to the surface.

Make a double boiler using a small saucepan filled with water and a heat proof bowl.

Place your chocolate in the bowl and, over low heat, melt the chocolate.

I like to use a dark chocolate between 70%-80% to cover this candy. The toffee is so wonderfully sweet, that a darker chocolate gives balance to the end result.

Once the chocolate has melted, pour over your toffee and spread with an offset spatula.

Sprinkle with salt and toasted pumpkin seeds! (To toast the seeds, spread on a sheet pan and put in an oven set at 300˚ F for about 8-10 minutes.)

Once the chocolate has set, break apart the toffee in large or small random sized pieces and enjoy!


Bon Appétit! 

Apple Cider Crumb Donuts

Since moving to this truly wild state of WV, I have discovered many things that my fall obsessed self took for granted back in beautiful ol’ New England. To start, there is the issue of seasons, which hardly exist here. Yes it was 35˚ out this morning, and yes it will be 70˚ later in the week. After sweating my little butt off all summer long—April to September, that is—I was ready for some brisk weather, was being the key word. I had big plans to apple and pumpkin pick, to run around in the crunchy, fallen, beautiful leaves and to eat 10# of candy corn while watching Hocus Pocus.

Sadly, my friends, this fall plan of mine is only about 10% possible. Why of course I can eat as much candy as I want and watch all the classic Halloween films, but the true fall activities aren’t exactly doable…

Do I want to drive 2+ hours to an orchard with an 80% of rain on a Sunday? The idea doesn’t sound too appealing, so naturally I will bring my fall fun to Charleston! So, as I light my plethora of autumn candles, I can now let the fall baking obsession commence yet again!

Apple Cider donuts are something that I could easily scarf down a dozen of, guilt free. I love the tartness from the cider, the warm coziness that is jam packed from so much cinnamon, and the pie-like crumble I sprinkle on top! Pie crumble? Yeah, you saw that right. I mean, who doesn't just love anything pie, perfect for literally any time of the year and in any form. If apple cider donuts don't make your mouth water enough, the addition of a buttery crust crumbly bit sure will! These donuts are not overly cakey, but have a rich denseness that, along with my way too many candle scents, will have you thinking you’re at an orchard stuffing your face with some post-picking goodies! 

Whether you're like me, who has to make their own little fall happen, or are surrounded by haunted houses and warm cider at the pumpkin patch, these super simple, and super autumn, donuts are just another addition you can add to your fall baking obsession repertoire!

IMG_5546.JPG

topping ingredients

Flour—7.5 oz, or 1 ½ C

Brown Sugar—1.25 oz, or 2 TBL

Cinnamon—0.1 oz, or 2 tsp

Butter (melted)—4 oz, or 1 stick/8 TBL

Apple Cider—1 oz, or 1 ½ TBL


topping process

Preheat your oven to 350˚ F.

In the bowl of your mixer, mix together the flour, sugar and cinnamon.

Slowly stream in your melted butter and apple cider just until the topping begins to form into little pebbles.

On a parchment paper lined sheet pan, spread out the crumble topping.

Bake for 10-12 minutes, until they begin to lightly brown.


batter ingredients

Apple Cider—12.5 oz, or 1 ½ C

Cinnamon Sticks—2

Flour—9.5 oz, or 1 ¾ C

Baking Powder—0.15 oz, or 1 tsp

Baking Soda—0.2 oz, 1 tsp

Cinnamon—0.05 oz, or ¾ tsp

Salt—0.05 oz, ¼ tsp

Egg—1

Butter (melted)—1.5 oz, or 3 TBL

Brown Sugar—6 oz, or 2/3 C

Milk—4.5 oz, or ½ C


batter process

In a small pot, combine your apple cider with the 2 cinnamon sticks.

Allow to boil until it has reduced to half (¾ cup), and cool.

In a large bowl, sift together the flour, baking powder, baking soda, cinnamon and salt.

Whisk together your egg, brown sugar and milk.

Add your melted butter to the dry ingredients and mix.

Next, add in the egg mixture, followed by the cool and reduced apple cider.

Once you have a smooth donut batter, pour into your donut pan (which should be sprayed with nonstick spray), filling up each compartment about halfway.

Sprinkle the baked crumble on top of your batter, completely covering it.

Bake your donuts for 12-15 minutes, until the outer edges are slightly brown.

Remove from the oven and allow to cool.

Take them out of the pan and enjoy!

These apple cider donuts are so yummy with a glass of warm cider, coffee, or even on their own!


Bon Appétit!